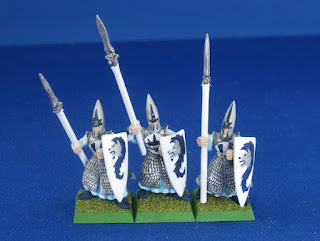
I've noticed that my blog has a lot of grey, black and white from all the unpainted metal and plastic. It's high time I post a paint-oriented article to get a little color into the mix!
Metallic colors are tough to do right in miniature scale. This is true of both metallic paints and so-called non-metal metallics (NMM), achieved by shading regular paint colors to achieve a metallic-looking effect through shade and highlight. I have recently been trying to improve my skills with both styles. One such effort was to paint a set of Ironwind Metals Battlemechs using an all metallic paint scheme. In this case, I chose the House Laio's 4th Tau Ceti Rangers.
In the past, I have done most of my metallics very simply by dry brushing a light metal color over a dark base. For over twenty years, my dark base of choice has been Ral Partha Steel*. That approach provides an OK effect. It's effective for Warhammer troopers that have dry brush friendly armor. It also works well for small areas of metals inside the joints of battlemechs, or on the engine bells of tiny starships.
For larger areas, this technique does not work as well. Metals do not show light and dark the same way that flat materials do. Metals have very bright highlights and very dark shadows. Unfortunately, without a reasonably smooth gradient, that kind of transition just does not look right, no matter the color. If you take another look at the elves in the last picture, you can see that the armor looks OK, with deep shadows between the bright armor highlights, but, without the fine details, the spear points tend to look kind of flat.
I did start this post by mentioning Battlemechs, right? Right.
For the 4th Tau Ceti, I had to tackle the broad, flat surfaces of 'mech armor with a bronze and gold paint scheme. Finding base colors to meet those colors was easy enough (Reaper Old Bronze and GW Shining Gold), but I had to mix shade colors to go all the way from black to bright silver. (For the purposes of metallic paints, silver = white.)
To get the darker shades, I mixed Reaper Blackened Steel, which is a fairly dark grey metallic, with black paint and painted it in successive, very thin inks along the shadowed portion of each panel. I used many, many layers to get a reasonable gradient from the base bronze down to almost black. For the highlights, I started mixing the bronze with silver in progressively lighter shades until I placed a tiny dot of pure silver along each of the brightest highlights.
The gold colors worked in almost the same way, except that I used a brighter gold metallic as an intermediary shade between the shining gold and the bright silver.
I still have a lot to learn and practice. One of the best 'aha' moments I've had was reading through handcannononline.com. One of their writers pointed out that metals usually show dark colors over most of their area. The bright highlight really only shows on a tiny area, and that area is the one facing the viewer, not the one facing the light source, as it would be on a matte surface. I haven't done much work with metals on large surfaces since reading that, but I am eager to try.
* Sadly, my last bottle of RP Steel is running out, and it doesn't look like I am likely to get a new supply soon. I've been experimenting with substitutes by mixing Reaper Master Series metallics. It seems to work pretty well, but it does feel like the end of an era. *snif*.


No comments:
Post a Comment